Creating a Scheduled Report
You can schedule a report using the "Schedule Report" button.
Select the relevant Report Template tile, and click "Select". From there you will need to select the relevant fields to utilise the data from the Hark Platform.
Basic Scheduling Options
By default, the basic schedule set-up requires the following fields:
Time Zone - select the time zone that the report should be generated in.
Schedule - this dictates how often you want the report, and what you want the reporting period to be. This varies depending on whether your report only has one period, or multiple comparison periods:
Daily
The schedule start date will be the next day (0:00) after the day of creation.
For single period reports: the full day before the schedule date, e.g. schedule date: 24th Jan, reporting period: 23rd Jan 0:00 - 23:59.
For multi-period reports: compares full day before schedule date, to the day before that, e.g. schedule date: 24th Jan, reporting periods: 23rd Jan 0:00 - 23:59, 22nd Jan 0:00 - 23:59.
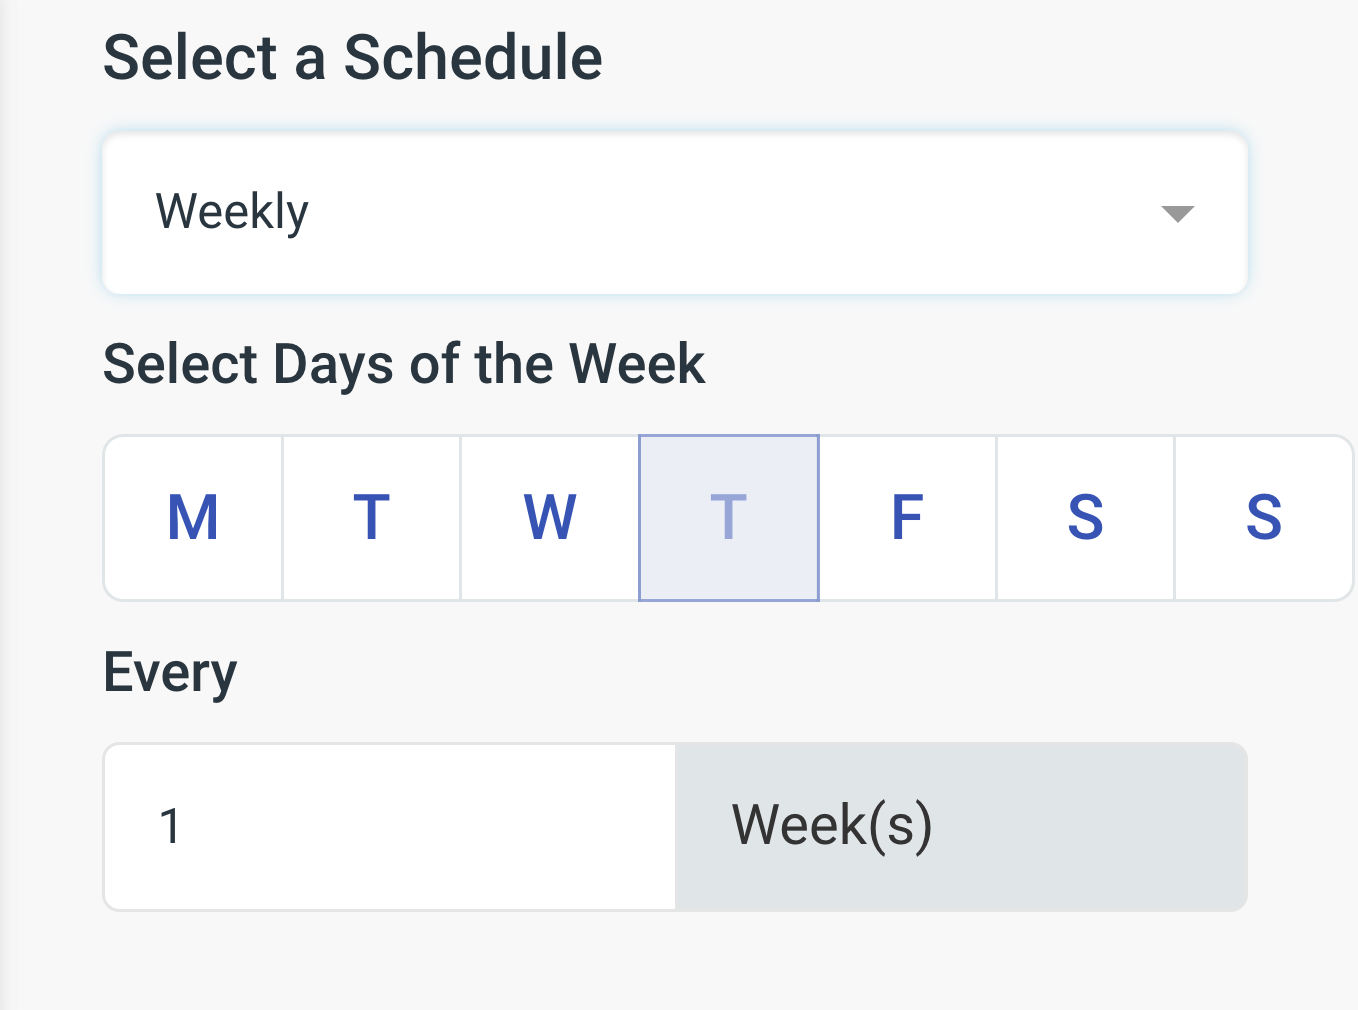
Weekly
The schedule start date will be the following Monday (0:00) after the day of creation.
For single period reports: the last full week (Monday 0:00 - Sunday 23:59, NOT last 7 days) before schedule date.
For multi-period reports: compares last full week (Monday 0:00 - Sunday 23:59, NOT last 7 days) before schedule date, to the week before that.
Monthly
The schedule start date will be the 1st of the next month (0:00) after the day of creation.
For single period reports: the last full calendar month (1st 0:00 - 28/29/30/31st 23:59) before the schedule date, e.g. schedule date is in March, the reporting period will be: 01 February - end February.
For multi-period reports: compares last full calendar month (1st 0:00 - 28/29/30/31st 23:59), to the month before that, e.g. schedule date in March, reporting periods: February, January.
Yearly
The schedule start date will be the 1st Jan (0:00) the year after the day of creation.
For single period reports: last full calendar year (1st Jan 0:00)
For multi-period reports: compares last full calendar year to the year before that (e.g. 2023, 2022)
Once all the mandatory and desired optional fields have been filled, you can click "Create" - your report will be scheduled and will generate based on the schedule parameters you have provided. Once the report has been generated, you will be able to view and export it from the Schedules Tab.
Advanced Scheduling Options
You can also select to use the "Advanced Scheduling" Options, which allows for more flexibility around the schedule start date/non-standard period selection. To use the advanced scheduling options, simply turn on the toggle switch named "Use Advanced Scheduling".
The additional options for advanced scheduling are as follows:
Schedule Date - this is the date (and time) when your report schedule will begin. This date/time must be in the future.
Timezone - select the timezone that the report should be generated in, this will apply to the schedule date, and any periods of data you select.
Repeat Schedule - this dictates how often you want the report, from the following options:
Daily - the report will generate every X day(s) at the same time as the schedule time.
Weekly - the report will generate every X week(s) on your selected day(s) of the week, at the same time as the schedule time. The schedule day is automatically selected based on the schedule date (e.g., if your schedule date is a Friday, then Friday is automatically selected). You can also choose extra days, e.g. if you wanted the report to generate every week on Mondays and Fridays.
Monthly - your report will generate every X month(s) on the same numerical date as the schedule date. For example, if your schedule date is "16th March", the schedule will run on the 16th of each month. If you select to schedule on the 29th, 30th or 31st of the month, we will take this as "the last day of the month", as not every month has more than 28 days.
Yearly - the report will generate every year on the same calendar date as your initial schedule date (e.g. 16th March 2025, 16th March 2026, etc.).
Once all the mandatory and desired optional fields have been filled, you can click "Create" - your report will be scheduled and will generate based on the schedule parameters you have provided. Once the report has been generated, you will be able to view and export it from the "Schedules" tab.
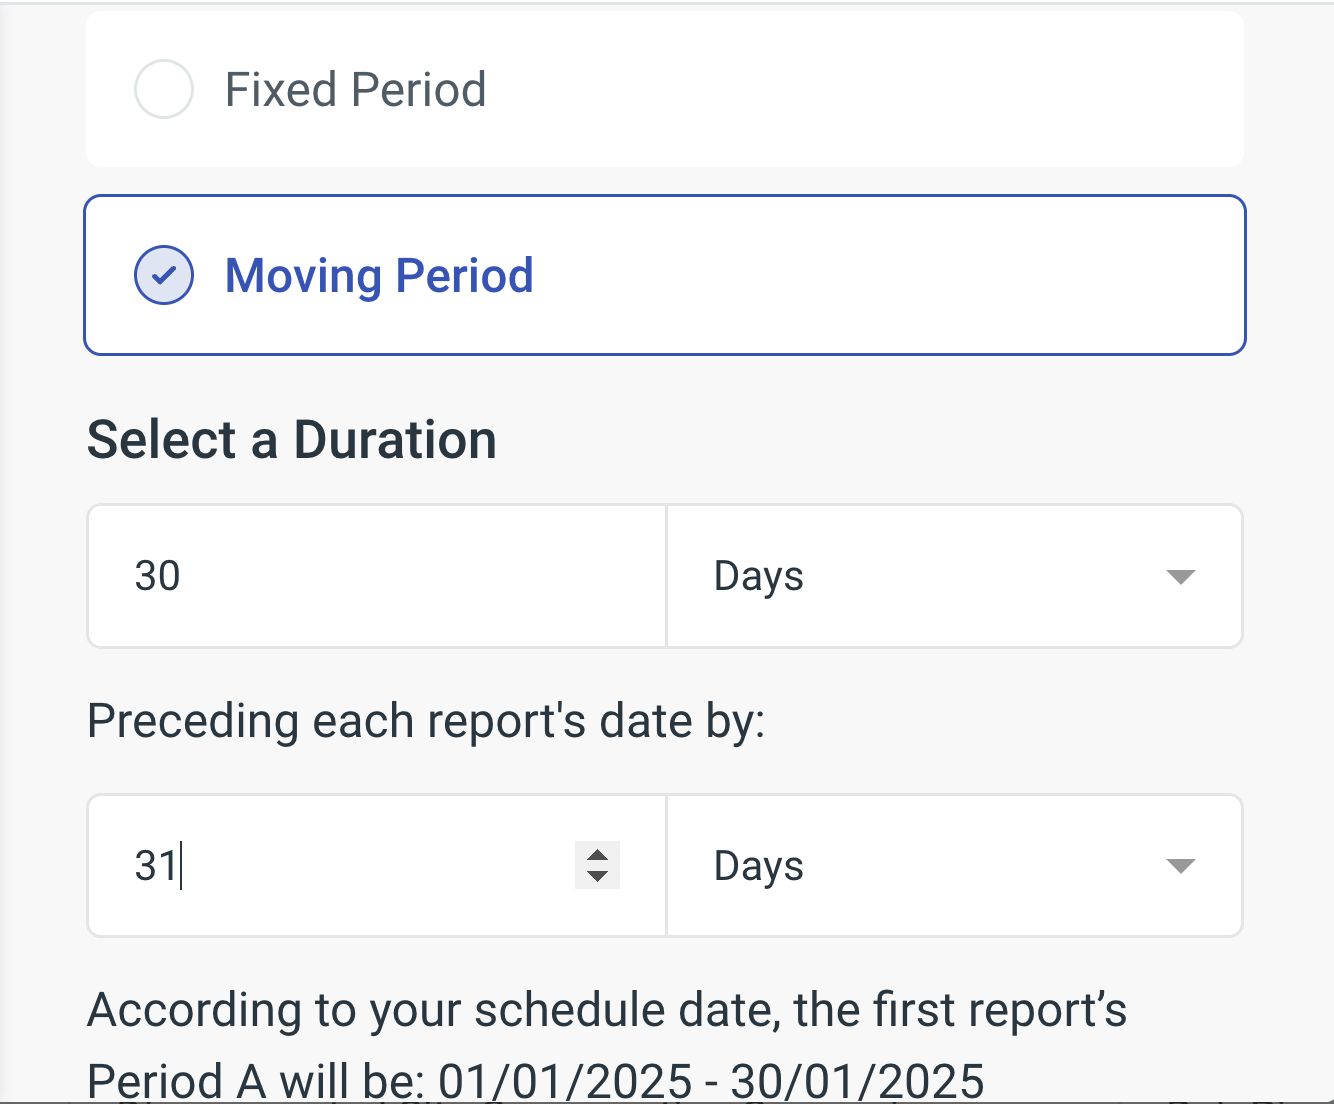
Fixed vs Moving Periods
When creating Report Schedules, you have the option to choose either a fixed or moving period to report on.
A fixed period allows you to select a date range, which will always be the same date range regardless of when the report is generated.
A moving period allows you to pick a dynamic date range which changes based on when the report is generated. Once a moving period has been entered, there is a message underneath which allows you to see and validate the reporting period for your first report.
Examples
Below are some hypothetical examples of where you may want to utilise fixed vs moving periods in a Scheduled Report (the examples are for comparison reports):
Example 1
"January 2024 showed record high energy usage. I would like to compare the next few years to this period to see if we exceed this usage again."
- Schedule Date - we would set this as the 1st February 2025
- Repeat Schedule - we would set this as "yearly"
- Period A - we would have this as a "Moving Period", with a duration of 30 days, preceding the report date by 31 days (i.e., 1st January - 31st January)
- Period B - we would set this period as a "Fixed Period" from the 1st January 2024 to the 31st January 2024.
Example 2
"at the end of the week, I want to see my energy usage for that week compared to the week before."
- Repeat Schedule - we would set this as "weekly", generating on a Sunday, every 1 week.
- Period A - we would have this as a "Moving Period", with a duration of 1 week, preceding the report date by 1 week.
- Period B - we would also have this as a "Moving Period", with a duration of 1 week, preceding the report date by 2 weeks.